FSH when creating instances
FSH (FHIR ShortHand) is a ‘Domain specific Language’ for creating FHIR resources of a number of types.
Initially It was created to assist with profiling by providing a simple way to specify the contents of a profile, and then generating the FHIR StructureDefinition resources from that using a ‘compiler’ app using an application such as one provided by the project called sushi.
Subsequently, it was extended to be able to produce ‘instances’ of FHIR resources, such as a patient instance with the details of a specific patient. These instances can be of the core types (in the spec) or profiled types.
This document describes how to use FSH to describe resource instances of both core resource types and profiles. It is written to support the clinFHIR Graph Builder, but should be broadly applicable.
FSH in the Graph Builder
This section describes how FSH is used within the Graph Builder.
The app will automatically update the FSH in 2 circumstances:
- When a resource is added to a view, the header information is automatically added to the FSH document associated with that resource
- When a reference is added to a graph, the Reference link is added to the FSH
Otherwise, only the FSH editor or manual editing will change the FSH.
There are 2 options for editing the FSH. Both are accessed from the 'Resource Content' tab that is shown when a resource is selected.
- It is possible to edit the document directly in the right hand pane of the page.
- Clicking the edit link (upper right to the FSH) will load the FSH editor.
FSH editor
This editor has a number of features to make it easier to edit the FSH document.
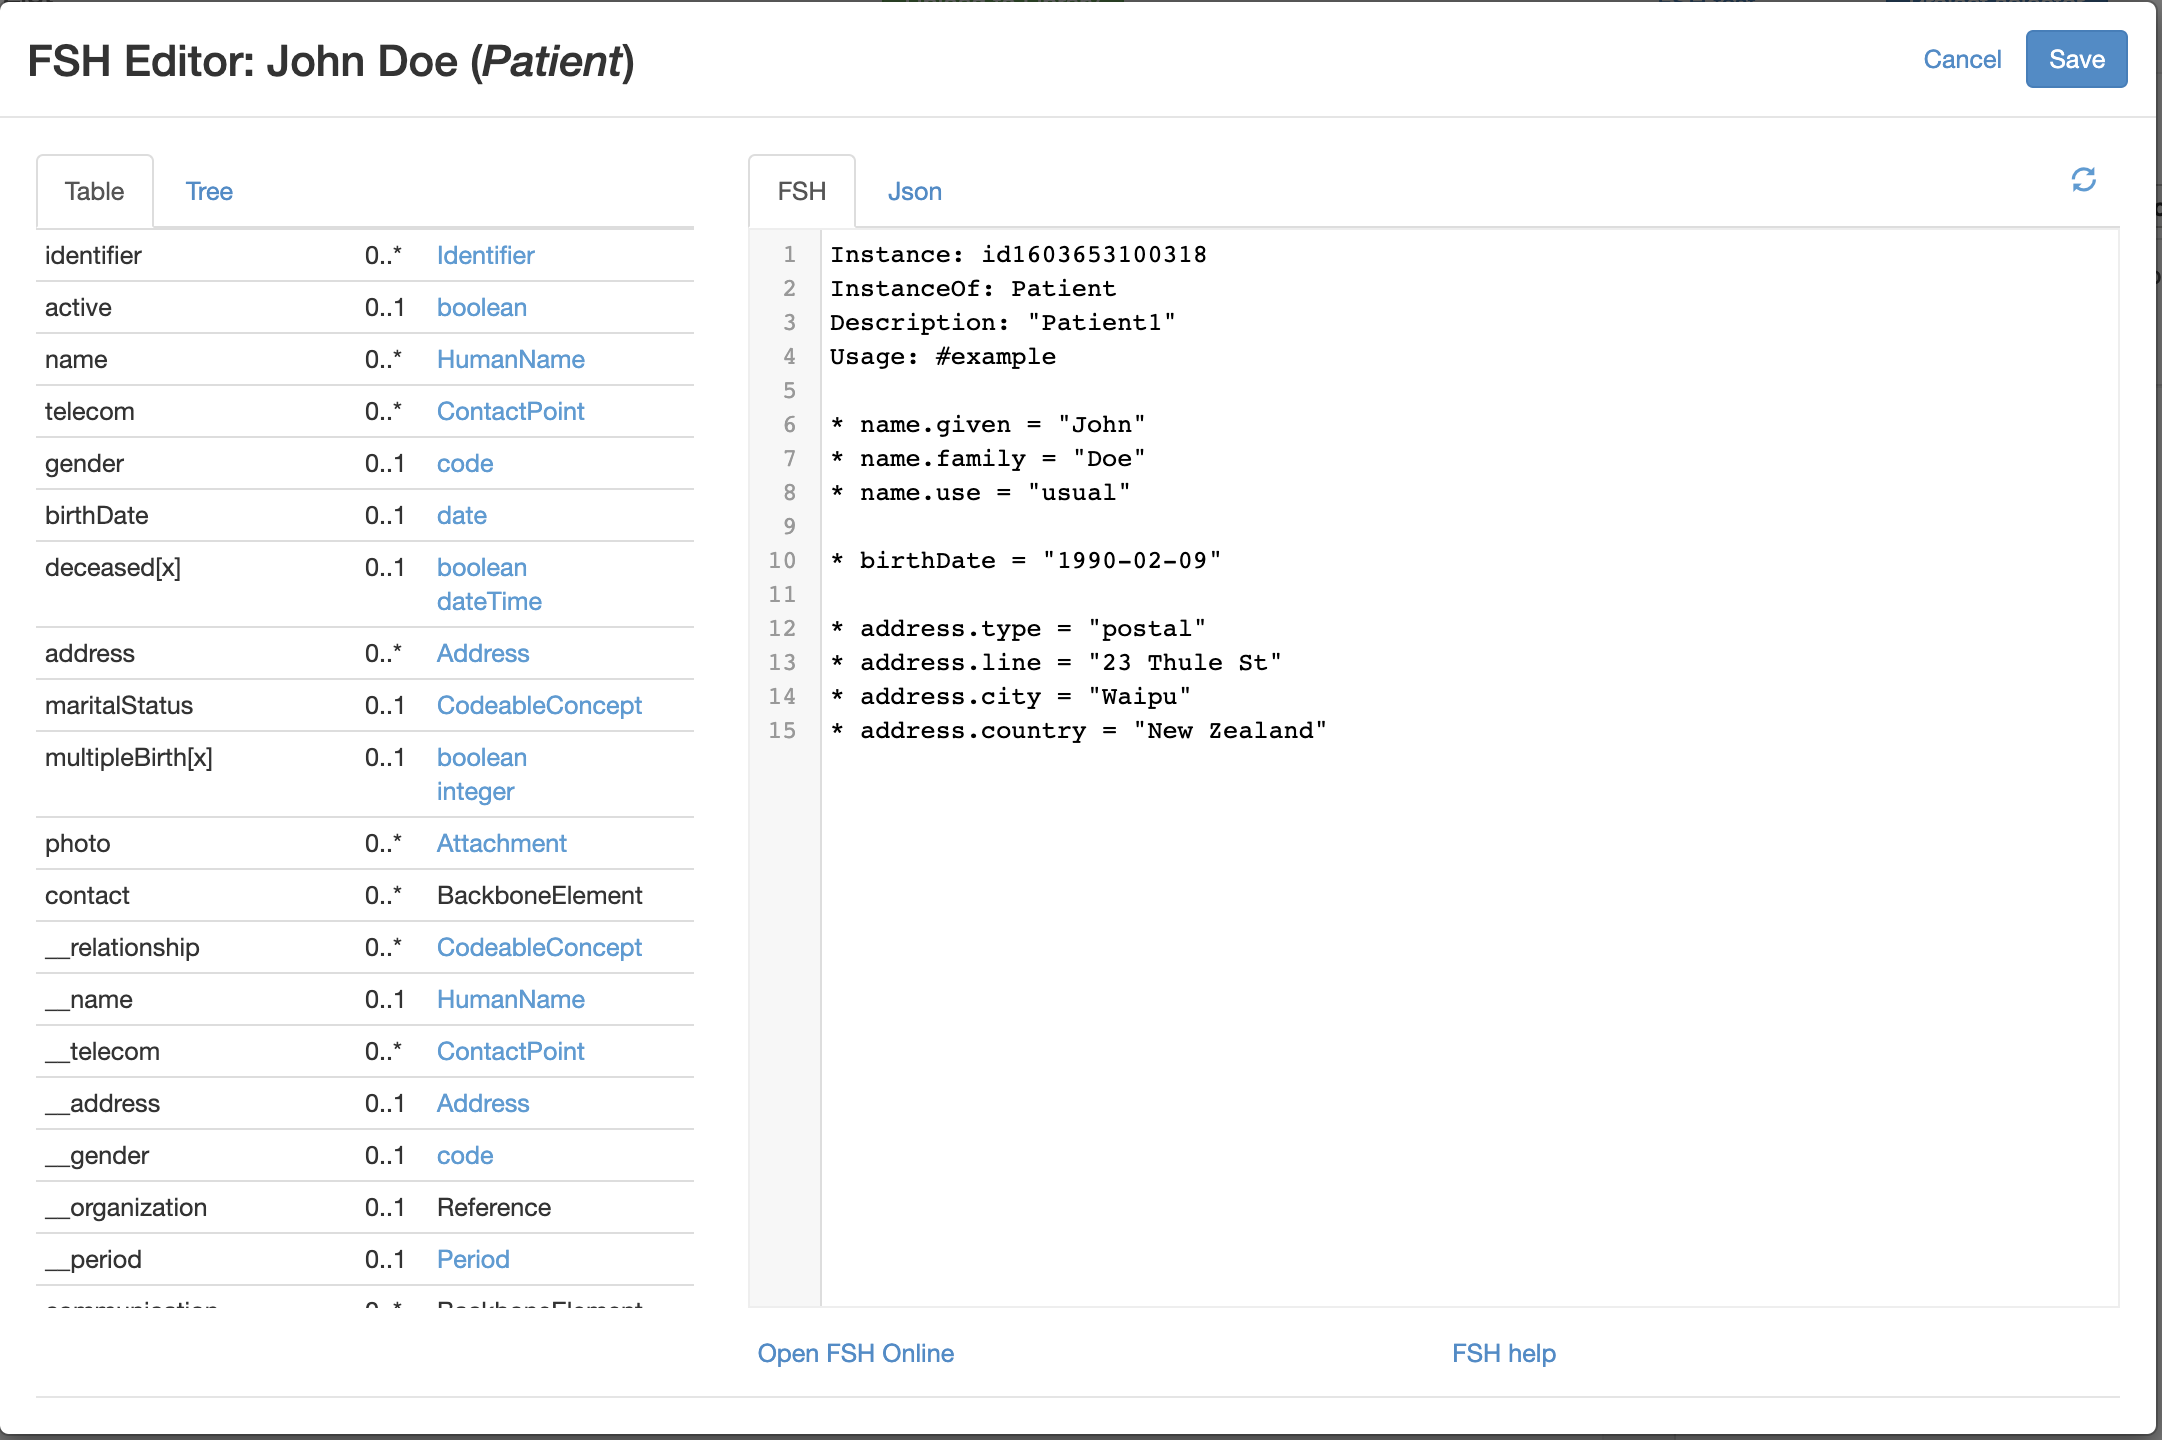
To the left is a scrollable list of all the elements in the selected profile. Clicking on the datatype displayed alongside the element name will display a form into which the values for the datatype can be added. When the form is saved, the FSH document will be updated. (The selection is based on the datatype rather than the element, as some elements can have multiple datatypes.)
Note
The editor is very early in its development, and has a number of limitations. In many cases the form shown is generic - it’s up to you to get the syntax correct. Coded elements do allow you to search for concepts using the terminology server (Ontoserver).
In some cases, you will need to edit the FSH directly after data has been inserted - often after using the datatype links in the left to insert a rule, then manually editing as required - which can involve changing and moving the rules. This is especially so when editing complex instance with multiple copies of an element in it.
Structure of FSH documents
There are 2 main parts to an FSH document:
- The header contains information about the instance
- The contents contain the structured data in the instance (expressed as ‘rules’). It can also contain comments.
Header
This will be automatically generated by the application, and has 4 lines:
- Instance: {id} - the id of the instance
- InstanceOf: {profile} - the profile that the instance is conformant to. This can be a core type as well as a profile
- Description: {text} - A description of the resource. It is not that useful in this context, and has the same value as the InstanceOf.
- Usage: #example - indicates that this is an example resource. This makes more sense when used as part of an Implementation guide
It is possible to alter the values if you need to. They won’t be overwritten.
Alias
An alias is used to make it easier to show URLs. It is usually at the top of the document above the header. For example (from MedicationStatement)
Alias: $mscategory = http://terminology.hl7.org/CodeSystem/medication-statement-category
...

* category = $mscategory#outpatient "Outpatient"
The alias name is often prefixed with a $, and is most useful when the same url is used multiple times
Contents
These are the instructions (FSH calls them rules) for the contents of elements. The syntax for the rules depends on the datatype of the element to add, and there is a special syntax for extensions. The examples below all assume that only a single value for any element is needed (eg a single name) - see below for a description of multiple elements.
Comments
You can also put comments in the FSH - preface these with // - for example
    //the current HPI
    * identifier.use = #official
    * identifier.system = "http://fhir/CodeSystem/hpi-provider-id"
    * identifier.value = "98ZZA"
References
References to other resources have the following format:
* focus = Reference(referral1)
In general you shouldn’t directly add these rules as they are automatically inserted into the FSH document when a reference is created in a view. However you can if you need to (Right now, for example, a reference rule is not removed when a reference is deleted in a view). Also, for more complex instances you may need to move or edit the deference. For example, when adding multiple references for a List resource, the app isn't (yet) smart enough to put in the prefixes...
Coded elements
code
The rule for the code datatype looks like this:
* gender = #male
The ‘*’ indicates that this is a rule, the ‘#’ states that this is a code, and the value follows the #.
CodeableConcept
A CodeableConcept element looks like:
* code = http://clinfhir.com/cs/taskType#referral "Referral"
* code.text = "Referral code"
The first line has the values for the concept in the format {system}#{code} “{description}”. Note that the description is surrounded by quotes and refers to the description in the terminology that defined the concept. It is optional.
The second line is the .text element of the codeableConcept. Again, it is optional. It’s also legitimate to have just the .text rule if the code & system are unknown.
Coding
A Coding element is the same as the first line above. It doesn’t have a .text option.
Simple data types
These are the datatypes that do not have child elements. The format is to include the element name, then the value of the element in quotes. For example:
* birthDate = "1970-07-19"
* name = "Orthopaedics"
Complex datatypes
These are datatypes that have child elements like HumanName, ContactPoint or Period. They are represented as the element name, a (.) and the child element name. The following is a complete example for HumanName
* name.text = "Sir Peter Fred Smith Jnr"
* name.use = #usual
* name.given = "Peter"
* name.given[1] = "Fred"
* name.family = "Smith"
* name.prefix = "Sir"
* name.suffix = "Jnr"
* name.period.start = "2001-01-01"
* name.period.end = "2006-01-01"
Notes:
- Each ‘child’ element has the name from the datatype definition, and the format is that of the child datatype (for example name.use is a code, name.given is a string).
- There are 2 instances of given name. The ‘[1]’ indicates which is the second one. See the description of multiple values for more information
- Where the child element itself is a complex type, then there is a dot (.) between each one - see the name.period element
Multiple elements
A number of elements can repeat - ie have multiple values. This is indicated in FSH using a ‘square bracket’ syntax. For example, the following person has 2 names, each with 2 given names:
* name.text = "Sir Peter Fred Smith Jnr"
* name.use = #usual
* name.given = "Peter"
* name.given[1] = "Fred"
* name.family = "Smith"
* name.prefix = "Sir"
* name.suffix = "Jnr"
* name.period.start = "2001-01-01"
* name.period.end = "2006-01-01"


* name[1].text = "Honest Pete"
* name[1].use = #official
* name[1].given = "Pete"
* name[1].given[1] = "Fred"
* name[1].given[2] = "Hollows"
* name[1].family = "Smith"
* name[1].prefix = "Sir"
* name[1].suffix = "Jnr"
* name[1].period.start = "2006-01-01"
* name[1].period.end = "2016-01-01"
The number in the brackets groups the different elements together. It’s 0 based, which is why the second name has the number 1 (You can include [0] for the first names if you wish - but it’s not required).
Note that the second name has 3 given names.
BackBone datatype
The backbone element is used to create ‘groups’ of elements that are related to each other. For example Patient.contact records the name, relationship and contact details for patients.
Extensions
Extensions are common in profiled resources and are the way in which new elements are added to resource instances. When a profile contains an extension, it includes a link to the extension definition (a StructureDefinition resource). The link also has a name - the slice name (this name reflects the underlying architecture where the extension link is a ‘slice’ on the extensions array).
When you add the extension to the instance in FSH, you need to know what this slice name is. It will be provided automatically in the editor.
The overall syntax is:
Extension[{slice name}].value{datatype} = {value}
Here’s an example of an extension (from US Core). This specifies the birthSex extension, and the value of M - which is a code datatype.
* extension[birthsex].valueCode = #M
This example is an extension on the alias element (It comes from a profile on Location) and has a datatype of CodeableConcept. Note the full path (including .coding.) to the system, code and display
* alias.extension[alias-type].valueCodeableConcept.coding.system = "https://standards.digital.health.nz/ns/alias-type-code"
* alias.extension[alias-type].valueCodeableConcept.coding.code = #short
* alias.extension[alias-type].valueCodeableConcept.coding.display = "Short"
Because it’s a CodeableConcept, this could be in a single line like this:
* alias.extension[alias-type].valueCodeableConcept.coding = https://standards.digital.health.nz/ns/alias-type-code#short "Short"
Or you could define an alias and use that:
Alias: $typeCode = https://standards.digital.health.nz/ns/alias-type-code
...

* alias.extension[alias-type].valueCodeableConcept.coding = $typeCode#short "Short"
Here’s an example of an extension that has sub-extensions. It is against the Practitioner.qualification element and has the slice name ‘regcode’ and a child extension of ‘status’
* qualification.extension[regcode].extension[status].valueCodeableConcept.coding.code = #active
In most cases the editor will get the syntax correct (as it gets it from the underlying profile) but you may want to move the rules around a bit in the display (and add comments).